
How to configure Quick Book for Supporting Multi-User Access
QuickBooks offers various features and tools to streamline bookkeeping tasks and improve financial management.

QuickBooks is a popular accounting software developed by Intuit. It is designed to help small businesses manage their finances, track income and expenses, create invoices, and generate financial reports. QuickBooks offers various features and tools to streamline bookkeeping tasks and improve financial management.

To configure QuickBooks for supporting multi-user access, follow these steps:
Step 1: Install QuickBooks
- Download and Install QuickBooks Desktop
- Download QuickBooks from the official website.
- Complete the installation process by following the on-screen instructions.
- Choose the Multi-User Host Installation option during installation.
Step 2: Enable Multi-Host User Access
- Open QuickBooks
- Open QuickBooks and click on File.
- Select Utilities and then Host Multi-User Access.
Step 3: Configure Database Server Manager
- Download Database Server Manager
- Download and update QuickBooks Desktop, and the Database Server Manager will update automatically.
- Install it on your server computer (the one hosting your company files).
- Ensure the Database Server Manager has permission to run on your server computer.
- Scan Company File with QuickBooks Database Server Manager
- Locate your company file on your PC.
- Click on the Start button and go to Programs.
- Open QuickBooks Database Server Manager.
- Choose Scan Folder to continue.
- Add the specific location and folder where you want to save the file.
- Click OK to proceed.
Step 4: Prepare Company File for Multiple Users
- Add Users and Grant Access.
- Set Up Users and Passwords.
- Open the company file and click on Set Up Users and Passwords.
- Click Next, then select Add Users separately.
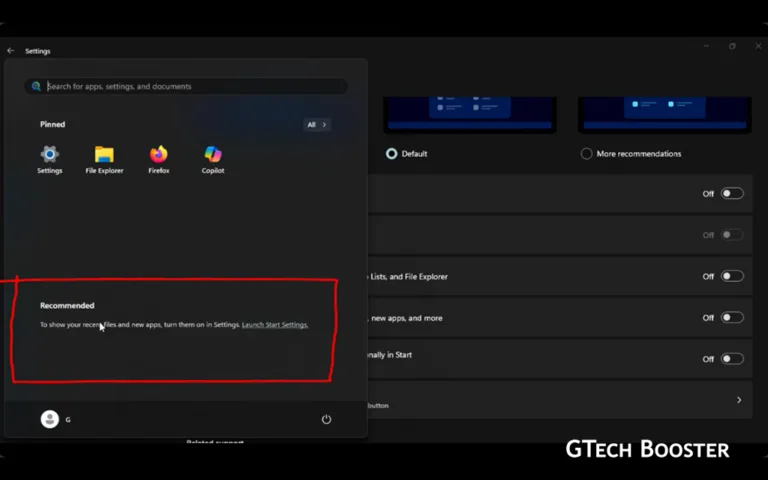
Step 5: Give Windows Admin Rights
For Windows 10 Users
- Open Settings, go to Accounts, and select Add another person on this PC.
- Choose I don’t have this person’s sign-in information and create a user without a Microsoft account.
- Assign a name and password to the account.
- Provide admin rights to the new user and select the account type as Admin.
For Windows 8 and 7 Users:
- Press Ctrl + R, open the Control Panel, and select Manage another account.
- Create a new account, assign a username, and choose the admin role.
Step 6: Start with a Company File Located on a Remote System
- Open QuickBooks.
- Open the QuickBooks file menu.
- Select Change to Multi-User Mode.
- In the Multi-User Setup Hosting window, choose Yes.
- Click OK on the Multi-User Setup Data window.
Best Practices
- Perform regular backups of the company file to safeguard against data loss or corruption.
- Educate all users on proper Multi-User Mode etiquette to minimize data conflicts.
- Assign user permissions carefully, granting access only to the data necessary for each user’s role.
- Regularly monitor your network and computer performance, especially during peak usage times.
- Regularly update QuickBooks to the latest version.
System Requirements
–QuickBooks Desktop Version
- Multi-User Mode is supported in QuickBooks Pro, Premier, and Enterprise editions.
–Network Setup
- The company file must reside in a shared network folder or on a server that all users can access.
–Licenses
- Each user who accesses QuickBooks in Multi-User Mode needs a valid QuickBooks license.
Video demonstration

By following these steps and best practices, you can successfully configure QuickBooks for supporting multi-user access.
More Information ℹ


Gabby
One comment
Comments are closed.
Be polite and constructive with your point.


Thanks so much, this has been helpful.